I had planned to do an upholstery project, which meant getting my great-grandmother's old Singer out of storage and working again. I knew the old machine would need a few bits tweaking and a good service, so naturally decided to look into how to do it.
Then I became distracted by all the pretty blogs on refurbishing old machines and generally FIXING things. Oops.
The idea of servicing the machine rapidly morphed into something altogether more ambitious, and in the end it became a much bigger job than I had anticipated. But to cut a long story, this:

...turned into this:

No, that's not G-grandmother's machine. I couldn't risk destroying that one! This one's from eBay: a £10 jobbie that was half-rusted and smelled heavily of mould. My plan was, if I destroyed it, at worst I would have a useful pile of spare parts for the other Singer.
Unfortunately it turned out that the family machine was made a good twenty years after this rust-bucket, and quite a few of the parts probably wouldn't be transferable anyway. Success or several kilos of gently rusting iron were now my possible outcomes.
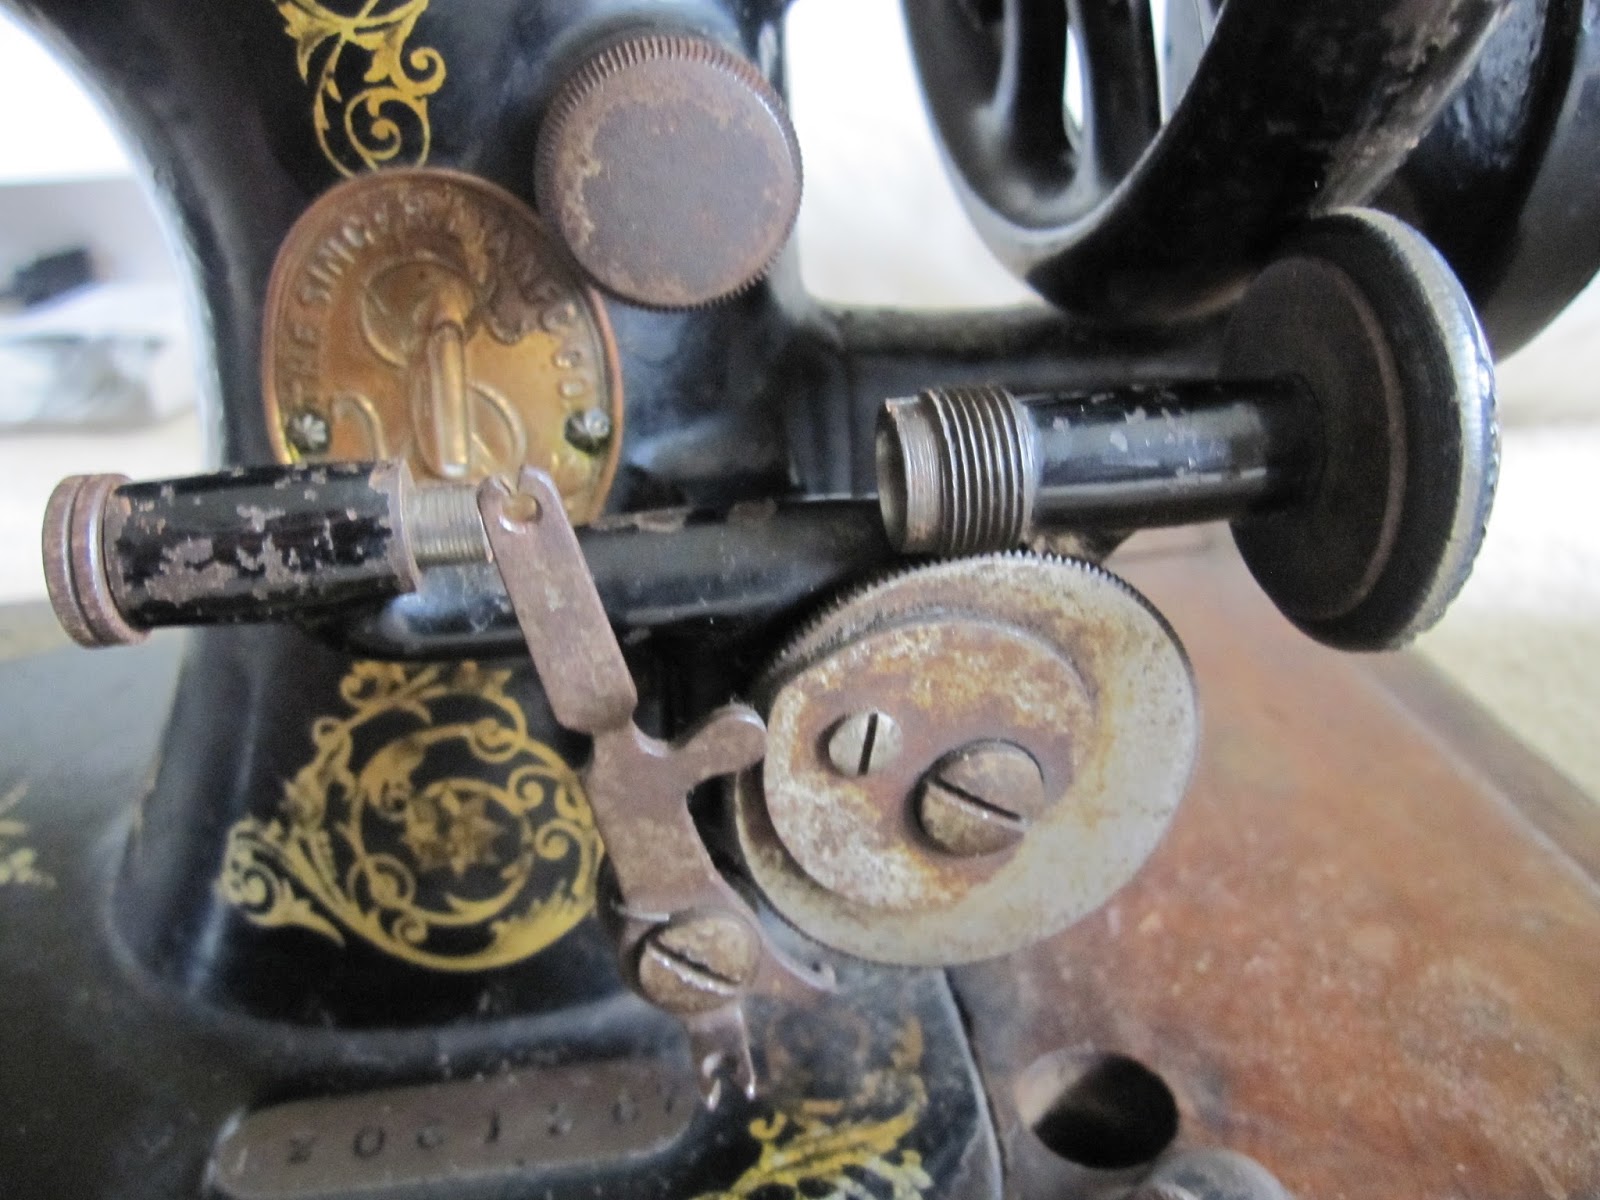
The first thing to do upon bringing the rusty machine home was to inspect it. The serial number dated the machine to 1893, but since that time it obviously hadn't had an easy life. There was very little or no chrome left on the unpainted metal parts, while all of the paint was chipped, scratched and irrecoverable. It had obviously seen quite a bit of damp in recent years. The wood of the casing had warped out of shape (as well as exhibiting some water damage) and there were now several gaps in the joints. There was also a small forest of mould growing under the drip tray, but that was scraped off in sheer disgust before I had time to think of photos. The mechanism was in surprisingly good shape though. It hadn't been used in 30 years, but it still turned over and made a fairly good stitch (sometimes tinged with a rusty hue!). Lastly, there were two funny metal nodules where the machine met the wooden case, covered by some sort of icky white sticky substance. I later discovered that these were once rubber bumpers, and made a mental note to find nicer replacements.


Next, I attacked the machine with a set of screwdrivers. Taking everything to pieces took the best part of a day to complete. Many of the screws were rusted in place and wouldn't budge, plus I wanted to make sure I properly documented the take down so that I could put it all back together again later. Some of the screw heads were already a bit mashed, and I'm ashamed to say I may have added a few extra... um... swirls to some of them during my fervid disassembly. But I'll know for next time.
Some parts of it would not come out at all. The needle bar had to remain where it was, as did the stitch length screw and several bits of the internal mechanism. The little swinging inspection flap was the worst though. Nothing would loosen the screw on that, and I needed to remove it in order to do a half-decent job on the respray. A drill was the only way forward, and the offending screw was soon a hollowed shell of its former self.


Once everything was taken apart, photographed and labelled, I could start with cleaning up the formerly-chromed, shiny metal bits. I placed these in various acidic liquids that were to hand: coke, vinegar and lime juice. The most effective one, incidentally, was lime juice. Most of the parts were only left to soak for a night, but the catch from the case was completely rusted solid. It took a week - A WHOLE WEEK - of soaking to loosen that particular bit up again. But now, with a bit of oil, it moves freely and even the lock works (with a screwdriver as the key) :-)


While everything was bathing in pools of acid, it was time to remove the old paint from the machine body. Stupidly, I went for the cheapest paint-stripping chemicals I could find, and of course these did very little except kill all the grass in my garden where I spilled bits of it. After a second trip to the shops, I returned with something stronger (although everyone complains that Nitromors isn't as strong as it used to be - true/false?). This stuff did make the paint bubble promisingly, but it was still the consistency of rubbery glue and very difficult to scrape off. If any of you try this at home, it is worth investing in one of these (see image below) to remove the softened paint. It plugs into your drill and will save you from some nasty RSI.

After much swearing and gnashing of teeth, I ended up with some bits that looked like this:


Paint stripping probably took two-to-three days to properly complete. NAKED.
Before I could do the next fun part, I had to cover or fill the parts that needed screening from nefarious liquids. Most of these special zones had already been masked off or stuffed during the paint stripping process, but the chemicals and sanding had destroyed these protective layers. Many ear buds were sacrificed in this process, as they perfectly fit into the oil holes.
Next, I sprayed the machine with a primer to prevent rust and provide a key for the paint.


This pattern would need a solid base coat. I chose this nice pillar box shade of rouge.

I think I ended up spraying around three coats of this stuff, sanding between them and leaving a day for the paint to dry where I needed to turn bits over to reach the undersides.
For the next stage, I would need some very special stencils that would produce a repeatable pattern - and not look as if they were hand drawn. I knew that sticky vinyl shapes could be cut by lasers, so I just needed to commission some of my own design!
I found a man to do this - a David Mills from Magnetic Marketing - who very kindly took my vector drawings and converted them into little sticky shapes. I thought applying them to the machine would be easy, but no... That took the best part of another day to do!


Once applied, I was free to do the next bit of spraying. I used a candy deep red automotive paint (from Specialist Paints) and applied quite a few coats to get as much of an effect as possible. Unfortunately, this meant that the stencils wanted to be good friends with the new coat of paint and would try to tear through it whenever I removed them. If I had sprayed just one layer of candy paint, they would have been much easier to remove... but it wouldn't have looked so pretty. Scoring along the edge of the stencils with a knife helped a bit, but it was still an intensely laborious process which took another day! Anyway, I eventually ended up with a pile of used stencils and this machine...


While all of that was drying off, it was time to tackle the wooden case. I'd already sanded the surface of this down, but it was still warped and had a few gaps in the joints that had been partially repaired. I didn't really want to mess with this too much, so I added some new glue to the repairs and began painting with a dark varnish. Incidentally, I've always hated seeing glue repairs that are painted in an attempt to match the woodwork, so I made them gold instead.


More decals went on the machine...


These were waterslide decals (like those temporary tattoos you have as a kid). They had to be placed on the machine and left to dry overnight. In spite of my best efforts, they looked a bit grey, wrinkly and bubbly the next day, but my horror at this sight was unfounded. Several liberal sprays of clear coat tidied them up and made them look pretty. The only problem was that (as I found out) clear coat takes several days to dry. I turned over my paint work after a day before spraying the other side... and it got stuck to the paper under it! You can still see the problem area here:

I fixed it as best I could, but the whole thing would have had to have been stripped down and repainted all over again in order to properly hide it. I don't think it looks toooo visible, however.
With clear coat applied, I could now start rebuilding and oiling the machine. This was surprisingly quick and easy to do. By this time, I had spent so much time cleaning, polishing and painting all the different bits that I had a fairly good idea of what they all did or where they should go. To replace the rubber bumpers, I found some nice little square ones that were just the right size, and I also got hold of a new rubber ring for the bobbin winder from Alansew. The only major problem I had was in finding a replacement screw for the one I had to drill out. I had to buy three different sizes before I found the right one!
Some of the parts needed bits of the new paint scraping off to make them fit better, but I got it running and sewing again in no time at all...


So there you go! Not quite perfect, but not bad, either!
Then I became distracted by all the pretty blogs on refurbishing old machines and generally FIXING things. Oops.
The idea of servicing the machine rapidly morphed into something altogether more ambitious, and in the end it became a much bigger job than I had anticipated. But to cut a long story, this:

...turned into this:

No, that's not G-grandmother's machine. I couldn't risk destroying that one! This one's from eBay: a £10 jobbie that was half-rusted and smelled heavily of mould. My plan was, if I destroyed it, at worst I would have a useful pile of spare parts for the other Singer.
Unfortunately it turned out that the family machine was made a good twenty years after this rust-bucket, and quite a few of the parts probably wouldn't be transferable anyway. Success or several kilos of gently rusting iron were now my possible outcomes.
The first thing to do upon bringing the rusty machine home was to inspect it. The serial number dated the machine to 1893, but since that time it obviously hadn't had an easy life. There was very little or no chrome left on the unpainted metal parts, while all of the paint was chipped, scratched and irrecoverable. It had obviously seen quite a bit of damp in recent years. The wood of the casing had warped out of shape (as well as exhibiting some water damage) and there were now several gaps in the joints. There was also a small forest of mould growing under the drip tray, but that was scraped off in sheer disgust before I had time to think of photos. The mechanism was in surprisingly good shape though. It hadn't been used in 30 years, but it still turned over and made a fairly good stitch (sometimes tinged with a rusty hue!). Lastly, there were two funny metal nodules where the machine met the wooden case, covered by some sort of icky white sticky substance. I later discovered that these were once rubber bumpers, and made a mental note to find nicer replacements.


Next, I attacked the machine with a set of screwdrivers. Taking everything to pieces took the best part of a day to complete. Many of the screws were rusted in place and wouldn't budge, plus I wanted to make sure I properly documented the take down so that I could put it all back together again later. Some of the screw heads were already a bit mashed, and I'm ashamed to say I may have added a few extra... um... swirls to some of them during my fervid disassembly. But I'll know for next time.
Some parts of it would not come out at all. The needle bar had to remain where it was, as did the stitch length screw and several bits of the internal mechanism. The little swinging inspection flap was the worst though. Nothing would loosen the screw on that, and I needed to remove it in order to do a half-decent job on the respray. A drill was the only way forward, and the offending screw was soon a hollowed shell of its former self.


Once everything was taken apart, photographed and labelled, I could start with cleaning up the formerly-chromed, shiny metal bits. I placed these in various acidic liquids that were to hand: coke, vinegar and lime juice. The most effective one, incidentally, was lime juice. Most of the parts were only left to soak for a night, but the catch from the case was completely rusted solid. It took a week - A WHOLE WEEK - of soaking to loosen that particular bit up again. But now, with a bit of oil, it moves freely and even the lock works (with a screwdriver as the key) :-)


While everything was bathing in pools of acid, it was time to remove the old paint from the machine body. Stupidly, I went for the cheapest paint-stripping chemicals I could find, and of course these did very little except kill all the grass in my garden where I spilled bits of it. After a second trip to the shops, I returned with something stronger (although everyone complains that Nitromors isn't as strong as it used to be - true/false?). This stuff did make the paint bubble promisingly, but it was still the consistency of rubbery glue and very difficult to scrape off. If any of you try this at home, it is worth investing in one of these (see image below) to remove the softened paint. It plugs into your drill and will save you from some nasty RSI.


Paint stripping probably took two-to-three days to properly complete. NAKED.
Before I could do the next fun part, I had to cover or fill the parts that needed screening from nefarious liquids. Most of these special zones had already been masked off or stuffed during the paint stripping process, but the chemicals and sanding had destroyed these protective layers. Many ear buds were sacrificed in this process, as they perfectly fit into the oil holes.
Next, I sprayed the machine with a primer to prevent rust and provide a key for the paint.

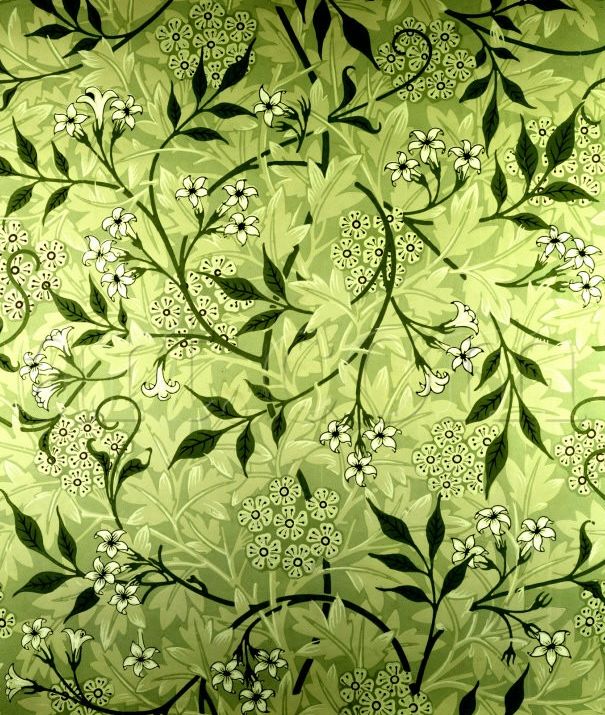
I already had some idea of how I wanted to repaint it. I'd seen this William Morris wallpaper print and wanted to take some ideas from it. It's dated to the 1870s, so would have been a little old-fashioned by 1893, but...well... artistic license and all that.
I decided to do a RED version. Because I like red.

I think I ended up spraying around three coats of this stuff, sanding between them and leaving a day for the paint to dry where I needed to turn bits over to reach the undersides.
For the next stage, I would need some very special stencils that would produce a repeatable pattern - and not look as if they were hand drawn. I knew that sticky vinyl shapes could be cut by lasers, so I just needed to commission some of my own design!
I found a man to do this - a David Mills from Magnetic Marketing - who very kindly took my vector drawings and converted them into little sticky shapes. I thought applying them to the machine would be easy, but no... That took the best part of another day to do!


Once applied, I was free to do the next bit of spraying. I used a candy deep red automotive paint (from Specialist Paints) and applied quite a few coats to get as much of an effect as possible. Unfortunately, this meant that the stencils wanted to be good friends with the new coat of paint and would try to tear through it whenever I removed them. If I had sprayed just one layer of candy paint, they would have been much easier to remove... but it wouldn't have looked so pretty. Scoring along the edge of the stencils with a knife helped a bit, but it was still an intensely laborious process which took another day! Anyway, I eventually ended up with a pile of used stencils and this machine...


No Singer case would be complete without a big, shiny decal, so I ordered some of my own design from Rothko (again by creating a vector drawing), and plastered them on:


These were waterslide decals (like those temporary tattoos you have as a kid). They had to be placed on the machine and left to dry overnight. In spite of my best efforts, they looked a bit grey, wrinkly and bubbly the next day, but my horror at this sight was unfounded. Several liberal sprays of clear coat tidied them up and made them look pretty. The only problem was that (as I found out) clear coat takes several days to dry. I turned over my paint work after a day before spraying the other side... and it got stuck to the paper under it! You can still see the problem area here:

I fixed it as best I could, but the whole thing would have had to have been stripped down and repainted all over again in order to properly hide it. I don't think it looks toooo visible, however.
With clear coat applied, I could now start rebuilding and oiling the machine. This was surprisingly quick and easy to do. By this time, I had spent so much time cleaning, polishing and painting all the different bits that I had a fairly good idea of what they all did or where they should go. To replace the rubber bumpers, I found some nice little square ones that were just the right size, and I also got hold of a new rubber ring for the bobbin winder from Alansew. The only major problem I had was in finding a replacement screw for the one I had to drill out. I had to buy three different sizes before I found the right one!
Some of the parts needed bits of the new paint scraping off to make them fit better, but I got it running and sewing again in no time at all...


So there you go! Not quite perfect, but not bad, either!