My boyfriend and I are currently converting a panel van into a windsurfing camper (more about that in a future post), and we needed something to sleep and sit upon that wasn't a pair of £1-petrol-station-tripod stools. What I came up with ended up looking something like this:
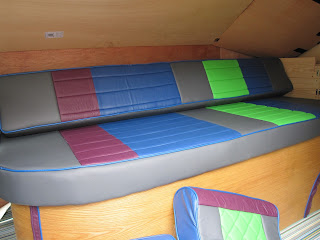
When I started, the man had already built the base of the pull-out bed (below). The seats we needed would have to be able to withstand soggy wetsuits, fold out into a bed and look a bit cool(?). I hadn't done any upholstery before, and hadn't really done any sewing since I was at school, so this was something of a learning process!

I discovered that there is a very good reason why upholstering is an expensive process - the materials alone cost £££, and the whole project (altogether) probably took me the best part of a week to complete.
Things needed:
9mm ply
welting
upholstery vinyl
upholstery thread
4" upholstery foam
scrim-backed foam
staples and staple gun
canvas
spray adhesive
sewing machine
The first thing I did was to draft a rough design of how I wanted the thing to look. I did this by Photoshopping an existing image of a car seat someone else had made, and drawing out a plan.


I then got hold of some thick plywood (9mm) and cut it down to size to make the bottom of the seat pieces. I needed three pieces in total: a base and two backs. The bipartite back was necessary because bits of the wall will need to open out above it (long story, will probably have its own blog post at some point).
Because of the bulk of the cushioning that would be added later, the boards also had to be narrower and shorter than the space the bed would eventually fill. There was a lot of faffing about and adjusting and tweaking, but I think in total there was about a two inch gap between the boards when laid out, and an inch around the outer edge of the bed where it would meet the walls or other bits of furniture.
Once the boards were cut to size, I got hold of a thin bread knife and attacked some upholstery foam. This is the expensive bit. A piece large enough to make a bed will set you back about £100. I did not want to risk having a bed that squished right down to the wood when weight was applied to it, so I went for the 4", high-density stuff. In retrospect, medium density might have been better. High-density foam does make quite a hard cushion, though I'm hoping it will squish more with use!
After following the advice of various internet tutorials, I cut the foam about 1" larger than the base boards along each side. Unfortunately, this turned out to be wayyyy too much excess, as high density foam just doesn't ploomf as much as the foams other people seem to have used. I ended up having to cut it down again later to about 1 - 1.5cm around the edges.

Next, a load of upholstery vinyl (this is the stuff with a scrim backing) was ordered from Fleabay and I set about cutting out all of the squares I'd need. As they were different sizes and this process was probably going to take an age to complete, I made sure to number each piece.


To do the actual sewing, I used a rather ancient family heirloom - this Singer 28k - made in 1912 and still running incredibly smoothly. It has Chinese characters on it because, although made in Scotland, it was actually bought out in Hong Kong. No idea what they mean though. Probably something like 'Singing Scottish Iron Needly Thing'.


When I started, the man had already built the base of the pull-out bed (below). The seats we needed would have to be able to withstand soggy wetsuits, fold out into a bed and look a bit cool(?). I hadn't done any upholstery before, and hadn't really done any sewing since I was at school, so this was something of a learning process!

I discovered that there is a very good reason why upholstering is an expensive process - the materials alone cost £££, and the whole project (altogether) probably took me the best part of a week to complete.
Things needed:
9mm ply
welting
upholstery vinyl
upholstery thread
4" upholstery foam
scrim-backed foam
staples and staple gun
canvas
spray adhesive
sewing machine
The first thing I did was to draft a rough design of how I wanted the thing to look. I did this by Photoshopping an existing image of a car seat someone else had made, and drawing out a plan.


I then got hold of some thick plywood (9mm) and cut it down to size to make the bottom of the seat pieces. I needed three pieces in total: a base and two backs. The bipartite back was necessary because bits of the wall will need to open out above it (long story, will probably have its own blog post at some point).
Because of the bulk of the cushioning that would be added later, the boards also had to be narrower and shorter than the space the bed would eventually fill. There was a lot of faffing about and adjusting and tweaking, but I think in total there was about a two inch gap between the boards when laid out, and an inch around the outer edge of the bed where it would meet the walls or other bits of furniture.
Once the boards were cut to size, I got hold of a thin bread knife and attacked some upholstery foam. This is the expensive bit. A piece large enough to make a bed will set you back about £100. I did not want to risk having a bed that squished right down to the wood when weight was applied to it, so I went for the 4", high-density stuff. In retrospect, medium density might have been better. High-density foam does make quite a hard cushion, though I'm hoping it will squish more with use!
After following the advice of various internet tutorials, I cut the foam about 1" larger than the base boards along each side. Unfortunately, this turned out to be wayyyy too much excess, as high density foam just doesn't ploomf as much as the foams other people seem to have used. I ended up having to cut it down again later to about 1 - 1.5cm around the edges.

Next, a load of upholstery vinyl (this is the stuff with a scrim backing) was ordered from Fleabay and I set about cutting out all of the squares I'd need. As they were different sizes and this process was probably going to take an age to complete, I made sure to number each piece.

Next, and most importantly, after all that knifing and cutting, I gave myself some pink as a reward.


Anyway, the pros of using this machine were that: 1) I didn't have to fork out £££ on an industrial machine; 2) I now knew how to service and repair it; 3) there would be little chance of the motor breaking (since the motor was essentially me); and 4) it's made entirely of iron anvils and therefore able to sew through very heavy materials.
The negatives I later discovered were: 1) keeping lines straight with one hand is a bit tricky (a lot of the time I failed); 2) no backstitch; and 3) this is still a domestic machine - when the layers became very thick over seams, the scarf of the needle would just graze against the presser foot and it would skip stitches. This led to much swearing. To lessen this effect, some sewing machines allow you to alter the timing by adjusting the needle bar. Not so on this machine. I found that using a size-90 needle (normally you'd use a 100 for upholstery) reduced the occurrence of this a bit, and pressing down on the top of the presser foot bar during each stitch also helped to squash the material more.
Anyway, the first bit of sewing was easy. I put together the bits with the seams which I didn't want to look rounded (i.e. were the blue meets the purple and green meets blue). I then marked out the lines where the faux tuck'n'roll would go, 4" apart. I used tailor's chalk for this, with is actually pretty useless on vinyl. Biro would have been better, if impossible to remove afterwards!

After that, I spray-glued some 10mm scrim foam to the back of the vinyl and top-stitched along the lines. I really wish I had chosen 6mm foam instead, which wouldn't have looked as cushiony, but would have been much easier to sew once it got to the later stages!
Some people advocate a Teflon presser foot for top stitching, as it doesn't tend to stick to the vinyl and mess up your stitches. Actually, I found the Teflon presser foot stuck just as much as the original metal one on my machine, so ho hum to that! The different vinyls also had a different amount of stick to them. Green and grey sailed through the machine, blue was just evil. Thankfully, these top stitches would be cut off later so it didn't matter if they looked a bit rubbish.

Once the top stitching along the lines was done (and I had to do this in several sections because it soon became too bulky to fit under the machine arm), the foam-vinyl sandwich is folded right-sides-together and sewn along the fold.

After that, I cut the bulk off the back. Very few people on the interweb tutorials ever mention this bit, but it'll make the final thing look much tidier.

When turned over, you'll have some faux tuck'n'roll!
I continued sewing away, adding some welting (or vinyl cording) to the top edge of each cushion. You can make the welting yourself, but I chose to buy it to save time and effort. Currently campercushions.co.uk are the only people I can find in the UK who sell it. I discovered that, when adding the welting, you have to sew as close to the rounded bit as possible, which involves carefully balancing the presser foot on top of it, whilst trying to feel for it through a layer of 10mm foam, vinyl and scrim! I tried a piping foot, but turns out you can't fit any bulk under that at all :-(.
So, after much more swearing and re-sewing, I ended up with this:

I then turned it upside down and forced the 4" foam into it, topping the cake off with the layer of ply. What followed was much more grunting and teeth grinding to make it all fit:

The next stage was to pull the vinyl taut over the foam, and staple it to the base of the ply. There seem to be conflicting instructions on the interwebs about how to properly do your stapling. I went for the 'perpendicular' approach.

After that, I added a layer of waterproof canvas to the bottom, stapling all the way along the edges and making sure that all of the staples were recessed into the fabric so that they wouldn't scrape on anything:


In the final product, there were a few more visible stitches than I would have liked, but some of that was because of the non-straight lines.
Lastly, I just had to make two more backing cushions and a couple of pillow-type things. Somehow, and I still don't understand how, some of my precious lines on the middle cushion didn't line up. I still have nightmares about that.


Overall though, I'm pretty pleased with the final thing!